Do you want to add next / previous links in WordPress?
Next and previous links are dynamic links that allow users to view the next or previous post.
In this article, we’ll show you how to easily add next/previous links in WordPress and how to make the most out of them.

What Are Next / Previous Links in WordPress?
Next / Previous links are dynamic links added by a WordPress theme that allow users to easily navigate to the next or the previous post. This can help to increase pageviews and reduce your bounce rate.
By default, WordPress blog posts are displayed in a reverse chronological order (newer posts first).
This means the next post is the one published after the current post a user is viewing, and the previous post is the one that was published before the current post.

The next/previous links allow users to easily navigate individual articles and blog archive pages. It also helps you get more pageviews for your blog.
Most WordPress themes come with built-in next and previous posts links which are automatically displayed at the bottom of each post. However, some themes don’t display them, or you may want to customize where and how they appear on your WordPress website.
That being said, let’s take a look at how to easily add next and previous links in WordPress.
Following is the list of topics we’ll cover in this article.
- Adding Next / Previous Links to WordPress By Using a Plugin
- Adding Next / Previous Links to a WordPress Theme
- Styling Next / Previous Links in WordPress
- Adding Next / Previous Links to Pages
- Adding Next / Previous Links with Thumbnails
- Removing Next / Previous Links in WordPress
Adding Next / Previous Links to WordPress by Using a Plugin
This method is easier and recommended for beginners who are not comfortable adding code to their websites.
First, you need to install and activate the CBX Next Previous Article plugin. For more details, see our step by step guide on how to install a WordPress plugin.
Upon activation, you need to visit the Settings » CBX Next Previous page. From here, you can choose where you want to show the next and previous links on your website.
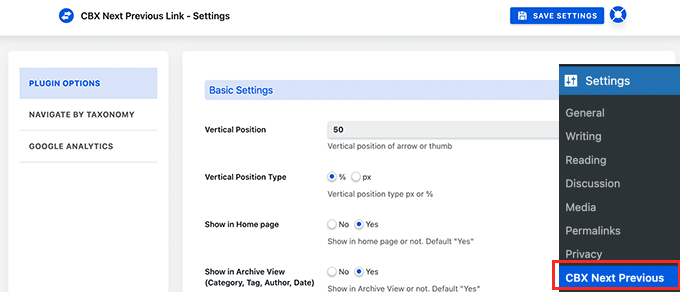
The plugin allows you to show Next and Previous link arrows on single posts, pages, archive pages, and more.
To make your next and previous links more relevant, you can also choose to display the next and previous posts from the same category or tag.
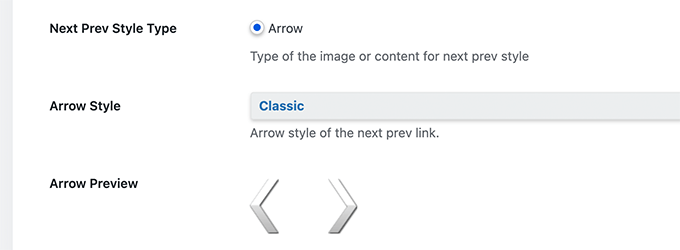
The free version of the plugin only allows you to display arrows for next and previous articles. You can upgrade to pro version to unlock other display options such as slide-in popup.
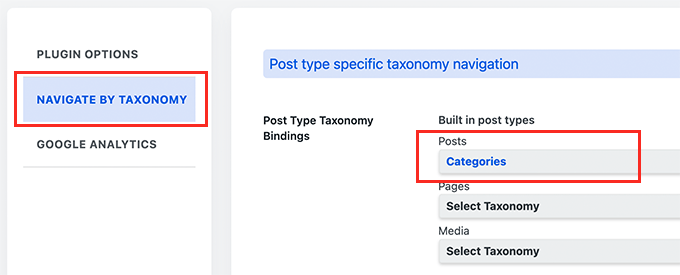
If you choose to display next / previous posts from same taxonomy, then you need to switch to the Navigate by Taxonomy tab.
From here, you need to choose which taxonomy you want to use to select next and previous links.
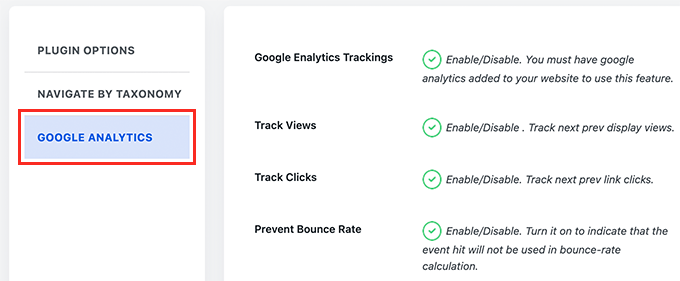
Optionally, the plugin also allows you to track clicks using Google Analytics. To use this feature, you’ll need to first install Google Analytics in WordPress.
After that, switch to the Google Analytics tab in plugin settings and enable click tracking options.
Once you are finished, don’t forget to click on the Save Settings button to store your changes.
You can now visit your WordPress website to see the next/previous links in action.
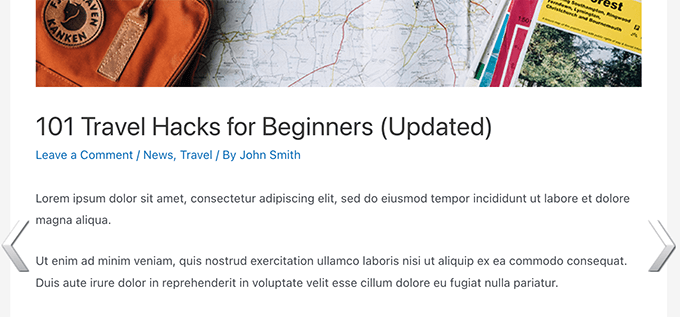
This method is easier but it does not give you much flexibility. For instance, the free version doesn’t display the next or previous post title.
If you need more flexibility, then continue reading.
Adding Next / Previous Links to a WordPress Theme
For this method, you’ll need to edit your WordPress theme files. If you haven’t done this before, then take a look at our guide on how to copy and paste code in WordPress.
Next, you’ll need to connect to your WordPress website using an FTP client or by using the File Manager app in your WordPress hosting control panel.
Once you are connected, you need to navigate to the /wp-content/themes/your-current-theme/ folder.
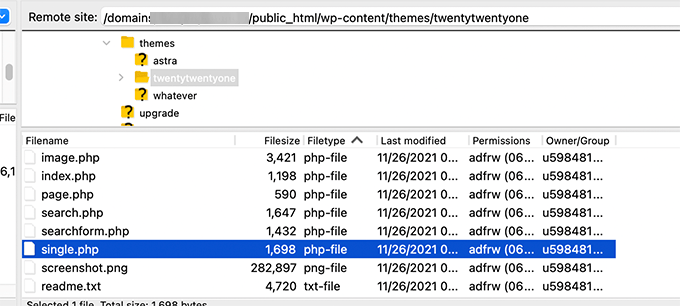
Now, you’ll need to locate the single.php file. This is the file responsible for displaying the single post items on your website.
Some WordPress themes may reference other files inside single.php file. These files are called template parts and are located inside the template-parts folder of your WordPress theme.
For more details, see our article on which files to edit in the WordPress theme.
After that, simply copy and paste the following code at the location in the template file where you want to display the next and previous links.
<?php the_post_navigation(); ?>
You can now save your changes and visit your website to see Next / Previous links in action.

The above template tag will simply show the link to next and previous posts with post title as the anchor text. It doesn’t say that these are the links to the next and previous articles.
Let’s change this a bit and provide users some context about these links. We’ll do this by adding the available parameters for the the_post_navigation template tag.
Simply replace the above code with the following:
<?php the_post_navigation( array(
 'prev_text'  => __( 'Previous Article: %title' ),
 'next_text'  => __( 'Next Article: %title' ),
 ) );
?>
You can now save your changes and preview your website.
Here is how it looked on our test site:

You can also use special characters and arrows along with next and previous post titles.
Simply replace the code with the following:
<?php the_post_navigation( array(
 'prev_text'  => __( '← %title' ),
 'next_text'  => __( '%title →' ),
 ) );
?>
Here is how this code looked on our test website:

Now let’s say you want to make the next and previous links more relevant to the article the user is currently viewing.
You can do that by showing the next and previous links from the same category or tags.
<?php the_post_navigation( array(
 'prev_text'  => __( '← %title' ),
 'next_text'  => __( '%title →' ),
 'in_same_term' => true,
 'taxonomy'	=> __( 'category' ),
 ) );
?>
This code tells WordPress to display next and previous posts in the same category. You can change taxonomy parameter to tags or any other custom taxonomy if needed.
Styling Next / Previous Links in WordPress
Now that we have learned how to add Next / Previous links in WordPress, let’s take a look at how to style them properly.
By default, WordPress automatically adds several default CSS classes to the post navigation links. You can use these CSS classes in your WordPress theme to style these links.
Here is some basic CSS that you can add to your theme.
.nav-links,
.posts-navigation .nav-links,
.post-navigation .nav-links {
	display: flex;
}

.nav-previous,
.posts-navigation .nav-previous,
.post-navigation .nav-previous {
	flex: 1 0 50%;
}

.nav-next,
.posts-navigation .nav-next,
.post-navigation .nav-next {
	text-align: end;
	flex: 1 0 50%;
}
This basic CSS simply displays next and previous links next to each other but on the different sides of the same line.
You can also make your navigation links standout by adding background color, hover effect, and more.
Here is some sample CSS code that you can use as an starting point.
.post-navigation {
background-color:#f3f9ff;
padding:0px;
}
.nav-previous, .nav-next{
padding:10px;
font-weight:bold
}
.nav-previous:hover,.nav-next:hover {
background-color:#0170b9;
}
.nav-previous:hover a:link ,.nav-next:hover a:link {
color:#fff;
}
This code styles the link text and adds some background color and hover effect to make next and previous links more prominent.

Adding Next / Previous Links to WordPress Pages
Normally, the post navigation links are used for blog posts in WordPress. That’s because those items are published in reverse chronological order.
On the other hand, WordPress pages are not generally published in chronological order. For more details, see our guide on the difference between posts and pages in WordPress.
However, some users may need to display page navigation so that users can find the next page easily.
Luckily, you can use use the same code we used earlier for pages. However, you’ll need to add the code inside page.php template.
<?php the_post_navigation( array(
  'prev_text'   => __( '← %title' ),
  'next_text'   => __( '%title →' ),
   ) );
?>
Here is how it looked on our demo site:

Adding Next / Previous links in WordPress with Thumbnails
Want to make your next and previous links more noticeable? Images are the easiest way to attract user attention and make these links more engaging.
Let’s add next and previous links with post thumbnail or featured image next to them.
First, you need to add the following code to theme’s functions.php file or a site-specific plugin.
function wpb_posts_nav(){
    $next_post = get_next_post();
    $prev_post = get_previous_post();

    if ( $next_post || $prev_post ) : ?>

        <div class="wpb-posts-nav">
            <div>
                <?php if ( ! empty( $prev_post ) ) : ?>
                    <a href="<?php echo get_permalink( $prev_post ); ?>">
                        <div>
                            <div class="wpb-posts-nav__thumbnail wpb-posts-nav__prev">
                                <?php echo get_the_post_thumbnail( $prev_post, [ 100, 100 ] ); ?>
                            </div>
                        </div>
                        <div>
                            <strong>
                                <svg viewBox="0 0 24 24" width="24" height="24"><path d="M13.775,18.707,8.482,13.414a2,2,0,0,1,0-2.828l5.293-5.293,1.414,1.414L9.9,12l5.293,5.293Z"/></svg>
                                <?php _e( 'Previous article', 'textdomain' ) ?>
                            </strong>
                            <h4><?php echo get_the_title( $prev_post ); ?></h4>
                        </div>
                    </a>
                <?php endif; ?>
            </div>
            <div>
                <?php if ( ! empty( $next_post ) ) : ?>
                    <a href="<?php echo get_permalink( $next_post ); ?>">
                        <div>
                            <strong>
                                <?php _e( 'Next article', 'textdomain' ) ?>
                                <svg viewBox="0 0 24 24" width="24" height="24"><path d="M10.811,18.707,9.4,17.293,14.689,12,9.4,6.707l1.415-1.414L16.1,10.586a2,2,0,0,1,0,2.828Z"/></svg>
                            </strong>
                            <h4><?php echo get_the_title( $next_post ); ?></h4>
                        </div>
                        <div>
                            <div class="wpb-posts-nav__thumbnail wpb-posts-nav__next">
                                <?php echo get_the_post_thumbnail( $next_post, [ 100, 100 ] ); ?>
                            </div>
                        </div>
                    </a>
                <?php endif; ?>
            </div>
        </div> <!-- .wpb-posts-nav -->

    <?php endif;
}
This code simply creates a function that displays the next and previous posts with featured images or post thumbnails.
Next, you need to add the wpb_posts_nav() function to your theme’s single.php file where you want to display the links.
If your theme already has next and previous links, then you may want to find the line that contains the_post_navigation() function and delete it.

Now add the following code to display your custom next and previous links.
<?php wpb_posts_nav(); ?>
After adding the code, don’t forget to save your changes and visit your website to see the links in action.

Now, you may notice that these links don’t look very clean.
Let’s change that by adding some custom CSS to style them.
.wpb-posts-nav {
    display: grid;
    grid-template-columns: 1fr 1fr;
    grid-gap: 50px;
    align-items: center;
    max-width: 1200px;
    margin: 100px auto;
}

.wpb-posts-nav a {
    display: grid;
    grid-gap: 20px;
    align-items: center;
}

.wpb-posts-nav h4,
.wpb-posts-nav strong {
    margin: 0;
}

.wpb-posts-nav a svg {
    display: inline-block;
    margin: 0;
    vertical-align: middle;
}

.wpb-posts-nav > div:nth-child(1) a {
    grid-template-columns: 100px 1fr;
    text-align: left;
}

.wpb-posts-nav > div:nth-child(2) a {
    grid-template-columns: 1fr 100px;
    text-align: right;
}

.wpb-posts-nav__thumbnail {
    display: block;
    margin: 0;
}

.wpb-posts-nav__thumbnail img {
    border-radius: 10px;
}
You can now save your changes and visit your website to view next and previous links with thumbnails.
Here is how it looked on our test site:

For more details, you can see our guide on how to add thumbnails to previous and next post links.
Bonus: Remove Next and Previous Links in WordPress
Some users may want to remove next and previous links in WordPress.
For instance, some users may find that these links are less helpful. Some may want to display related posts or popular posts instead.
There are two ways you can remove the next and previous links in WordPress.
Method 1. Delete The Code in Your WordPress Theme
To remove the next and previous links in WordPress, you’ll need to remove the code responsible for displaying the links in your WordPress theme.
The problem with this approach is that as soon as you update your theme, the deleted code will come back.
To avoid this, you’ll need to create a child theme.
Next, you need to find the code responsible for displaying the next and previous links in your parent theme.
Usually, it is found inside single.php or content-single.php templates.
Basically, you’ll be looking for the code that includes the following function.
<?php the_post_navigation() ?>
This code may have a slightly different format and parameters to it. For instance, on our test site the theme used this code to display the links:
the_post_navigation(
				array(
					'prev_text' => '<span class="nav-subtitle">' . esc_html__( 'Previous:', 'mytheme' ) . '</span> <span class="nav-title">%title</span>',
					'next_text' => '<span class="nav-subtitle">' . esc_html__( 'Next:', 'mytheme' ) . '</span> <span class="nav-title">%title</span>',
				)
			);
If you are using a child theme, then you need to duplicate this particular template in your child theme and then delete the lines used to display next or previous links.
If you would rather just delete it in your parent theme, then you can do that as well.
Deleting the code will stop WordPress from displaying next and previous links.
Method 2. Hide The Next and Previous Posts Links
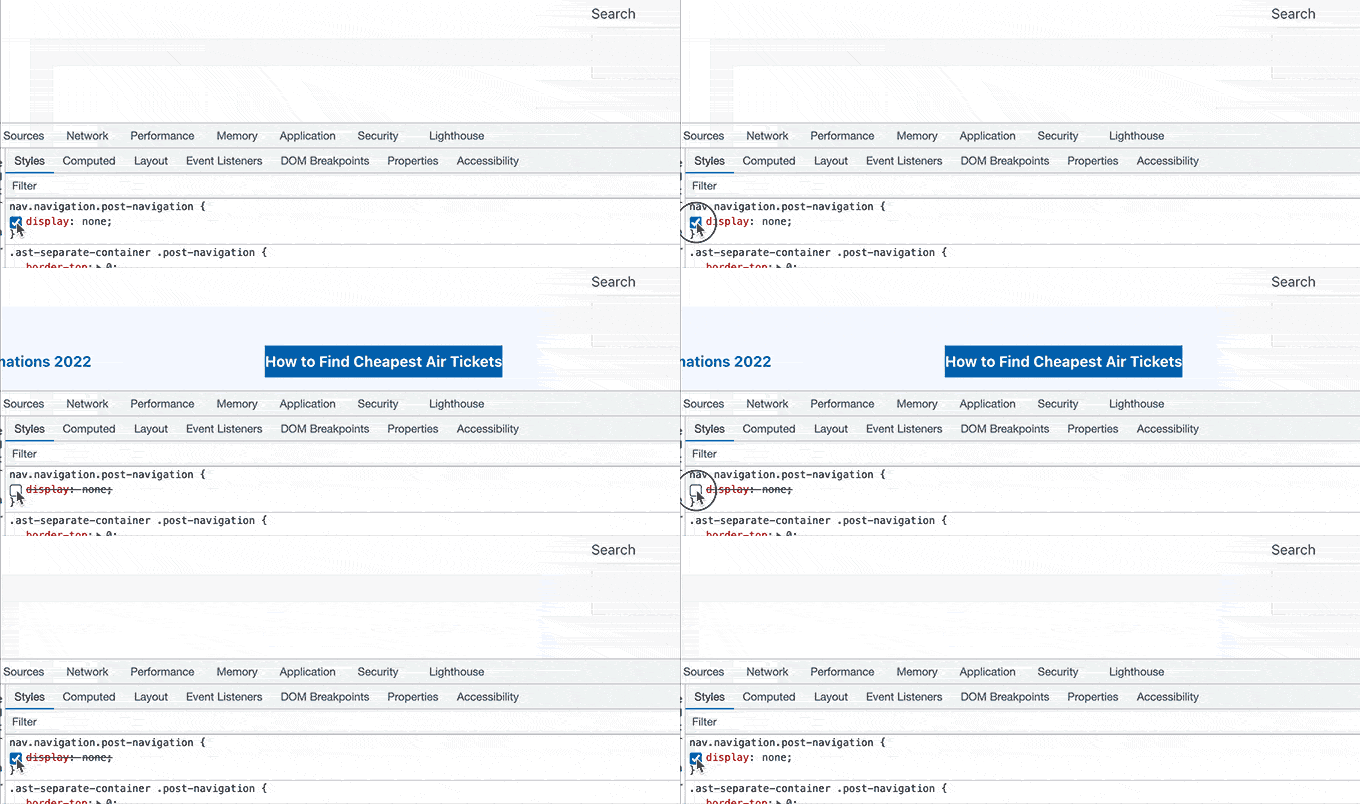
This method doesn’t really remove the next and previous links. Instead, it just makes them invisible to human readers.
Simply add the following Custom CSS to your WordPress theme.
nav.navigation.post-navigation {
    display: none;
}
Don’t forget to save your changes and visit your website to see the navigation links disappear.
We hope this article helped you learn how to easily add next and previous links in WordPress. You may also want to see our guide on how to choose the best web design software, or our expert comparison of the best domain registrars.
If you liked this article, then please subscribe to our YouTube Channel for WordPress video tutorials. You can also find us on Twitter and Facebook.
The post How to Add Next / Previous Links in WordPress (Ultimate Guide) first appeared on WPBeginner.
