Do you want to update the PHP version of your WordPress site?
Using the latest version of PHP in WordPress can significantly improve your site’s performance and user experience. Many web hosting providers make the update process rather easy, but you may need to check several things before doing it.
In this article, we will show you how to easily update the PHP version of your WordPress website.
Why Update PHP Version in WordPress?
Updating your WordPress website’s PHP version can boost your site’s performance.
You see, WordPress is developed using an open-source programming language called PHP. At the time of writing this article, it requires at least PHP 7.4 or greater.
New PHP versions usually come with patches for security vulnerabilities and bugs, protecting your site against malware and hackers. It also includes new features to make running processes much faster and reduce memory usage.
Because of this, we strongly recommend updating your WordPress to the latest stable version of PHP. At the time of writing this article, that is PHP 8.3.2.
If you use an older PHP version, your website may be less secure, slower, and prone to errors due to compatibility issues with WordPress core, plugin, or theme. You can learn more about this topic in our article about how PHP updates by your web host impact WordPress.
Thankfully, most WordPress hosting companies strive to offer the newest PHP versions to meet WordPress’ requirements. They may also automatically update PHP behind-the-scenes and you may not notice any change.
That said, we suggest keeping up-to-date with the latest PHP news. Check what kind of features or changes may affect your WordPress website. A plugin, theme, or software may not work after the update and you have to switch back to an older version of PHP in the meantime.
With that in mind, let’s look at how you can check your current PHP version in WordPress. We will also show you a step-by-step tutorial on how to update your PHP version in different hosting providers.
- How to Check Your Current PHP Version in WordPress
- What to Do Before Updating PHP in WordPress
- How to Update Your PHP Version in Bluehost
- How to Update Your PHP Version in Hostinger
- How to Update Your PHP Version in SiteGround
- How to Update Your PHP Version in HostGator
- How to Update Your PHP Version in DreamHost
- How to Update Your PHP Version in WP Engine
- How to Update Your PHP Version in Other WordPress Hosting Providers
- Changing PHP Versions in WordPress: Frequently Asked Questions
How to Check Your Current PHP Version in WordPress
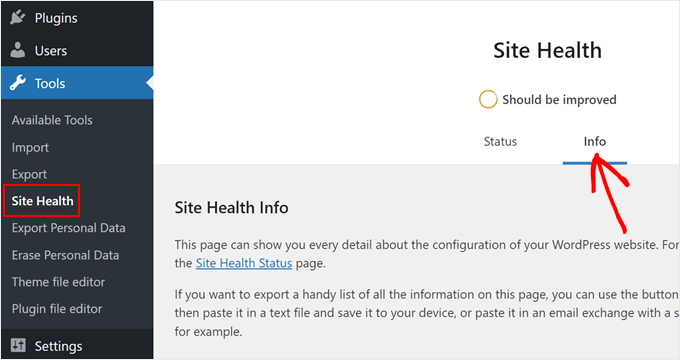
WordPress makes it easy to check the version of PHP used by your host. What you need to do is log in to your admin dashboard and head to the Tools » Site Health page.
Then, switch to the ‘Info’ tab.
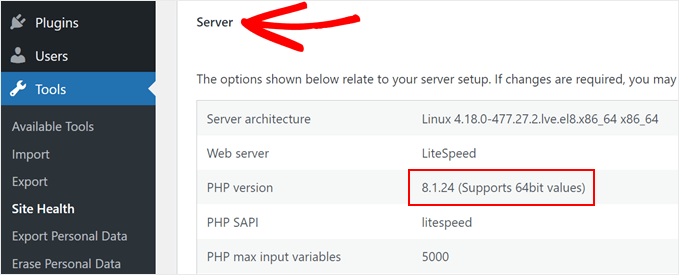
Next, you need to scroll down a little and click to expand the ‘Server’ tab. This section shows your server’s system information, including its PHP version.
As you can see in the screenshot, our demo website uses PHP version 8.1.
What to Do Before Updating PHP in WordPress
As with any updates, you want to make sure your live site won’t experience any errors before making the changes official. For this reason, you need to do the following before updating your PHP version:
- Update WordPress core, themes, and plugins – Doing this can ensure they can operate effectively with the new PHP. Must-have WordPress plugins from reputable developers will usually be readily compatible with newer versions of PHP.
- Back up your website – Use a backup plugin like Duplicator to create a website backup in case of issues. You can easily restore your site to an error-free version if disaster strikes.
- Create a staging site – We recommend trying to update your PHP in a staging environment so that any errors caused by the new PHP version won’t affect your live site.
- Use the PHP Compatibility Checker plugin – Created by WP Engine, this plugin can identify potential issues that may come up from the new PHP version.
How to Update Your PHP Version in Bluehost
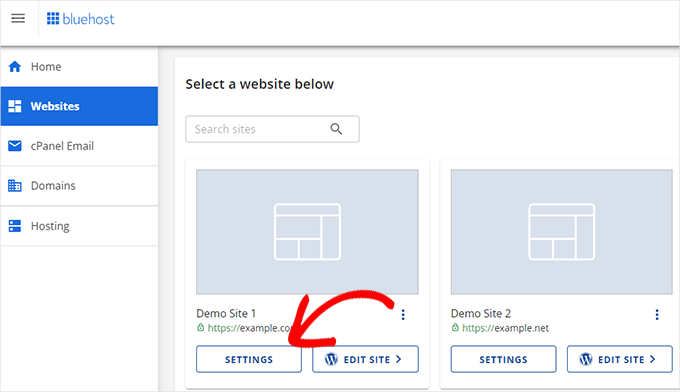
First, you need to log in to your Bluehost hosting account’s control panel and click on the ‘Websites’ tab in the left column.
After that, select the website whose PHP version you’d like to update, and click the ‘Settings’ button.
Now, go ahead and switch to the ‘Settings’ tab.
This is where you can see and configure the advanced settings of your WordPress blog or website.
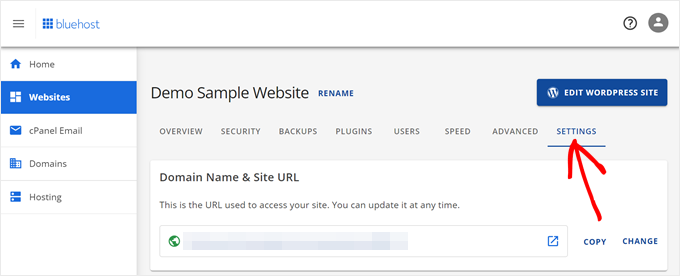
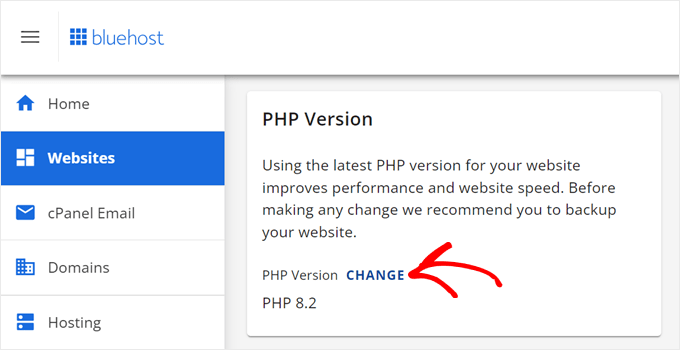
What you need to do now is scroll down to the PHP Version section.
After that, click ‘Change’ next to your current PHP version.
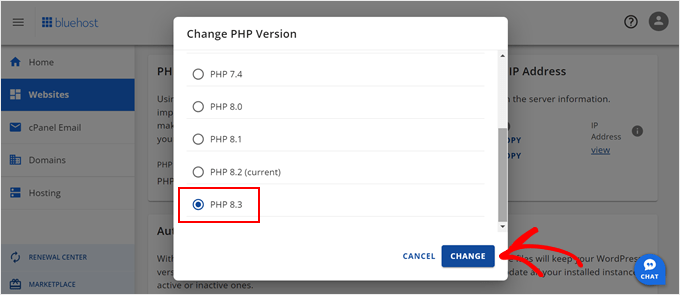
Now, go ahead and select the PHP version you want to update to. Then, simply click the ‘Change’ button.
Bluehost will now start using the selected PHP version for your website.
How to Update Your PHP Version in Hostinger
First, log in to your Hostinger account dashboard and switch to the ‘Websites’ tab.
From here, you need to click the ‘Manage’ button next to the website where you want to change the PHP version.
This will take you to that particular website’s dashboard.

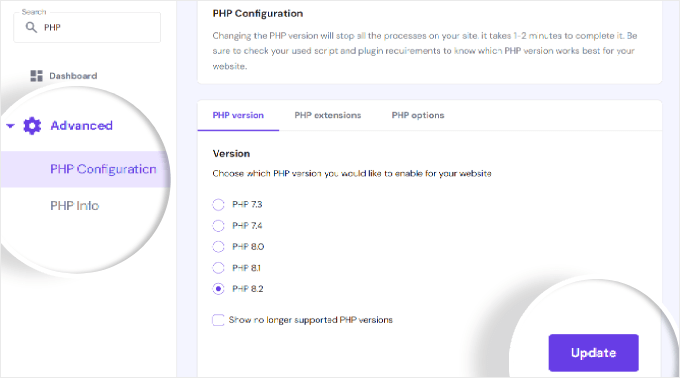
Next, locate the ‘PHP Configuration’ tab under the Advanced menu from the left sidebar.
Hostinger will now show you available and supported PHP versions to choose from.
Select the PHP version you want to use and click the ‘Update’ button to save your settings.
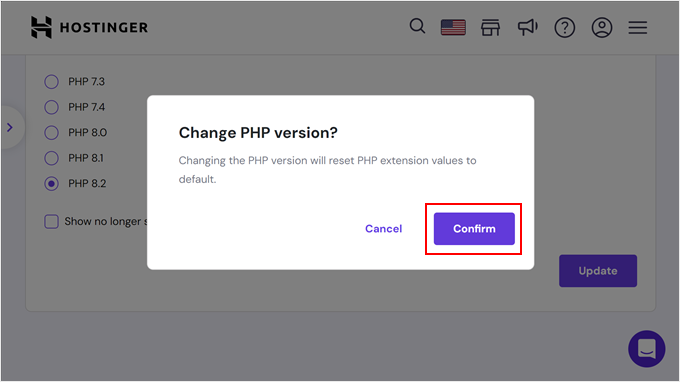
A popup will appear asking you to confirm your website, blog, or online store’s PHP update.
Simply click ‘Confirm’ to continue.
How to Update Your PHP Version in SiteGround
If you are using SiteGround, then here is how you will update the PHP version of your WordPress website.
First, you need to log in to your SiteGround account dashboard.
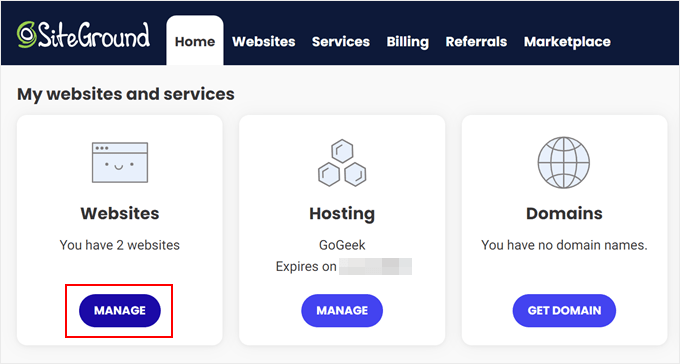
After that, go to the ‘My websites and services’ section and click the ‘Manage’ button inside Websites.
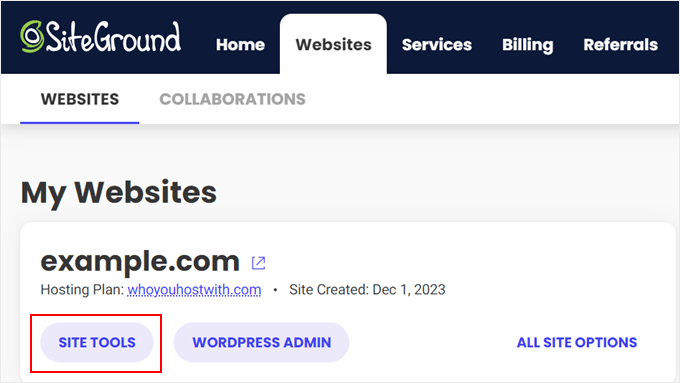
You will now arrive at the My Websites page.
Just click on the ‘Site Tools’ button under the website you want to update the PHP version in.
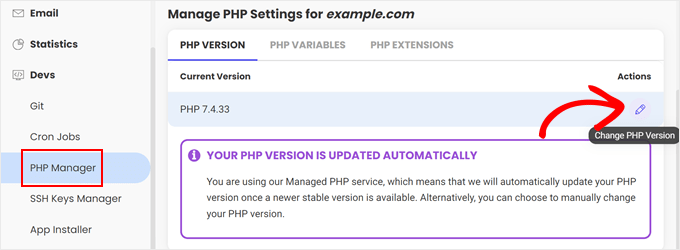
Next, you need to select the ‘PHP Manager’ menu inside the ‘Devs’ section from the left column.
From here, you can scroll down to the PHP Version tab and click the pencil button next to your PHP version.
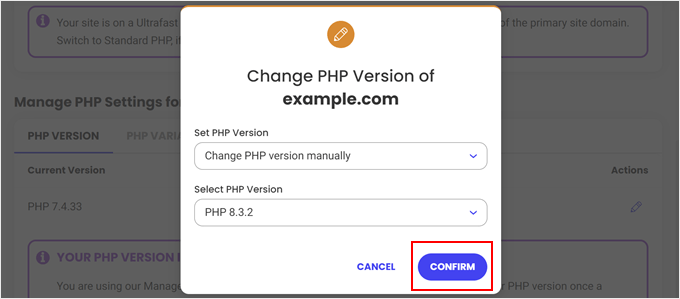
This will bring up a popup. You first need to select ‘Change PHP version manually’ under the ‘Set PHP Version’ option.
After that, you will be able to select your PHP version from a dropdown menu.
Don’t forget to click on the ‘Confirm’ button to apply your changes.
How to Update Your PHP Version in HostGator
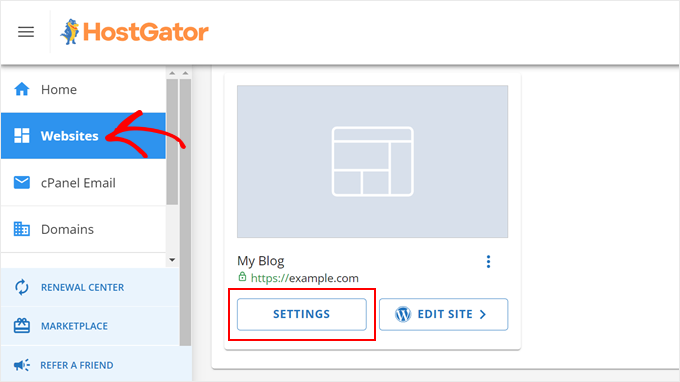
What you need to do first is log in to your HostGator hosting account dashboard and click on the ‘Websites’ section.
After that, click the ‘Settings’ button on the website whose PHP version you want to update.
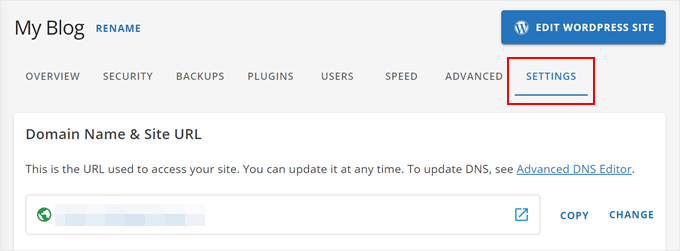
Next, simply switch to the ‘Settings’ tab.
In this section, you can manage your website’s advanced settings.
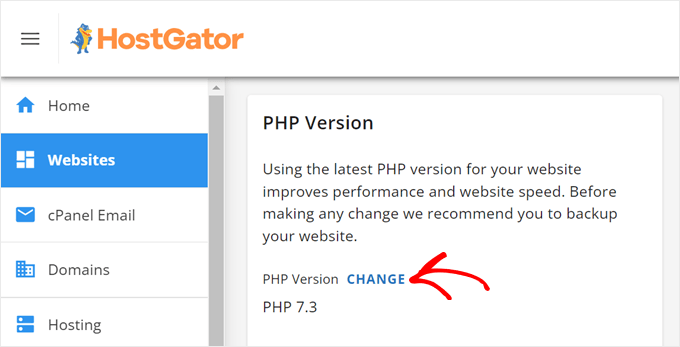
At this stage, just scroll down to the PHP Version section.
Then, click ‘Change’ next to your current PHP version.
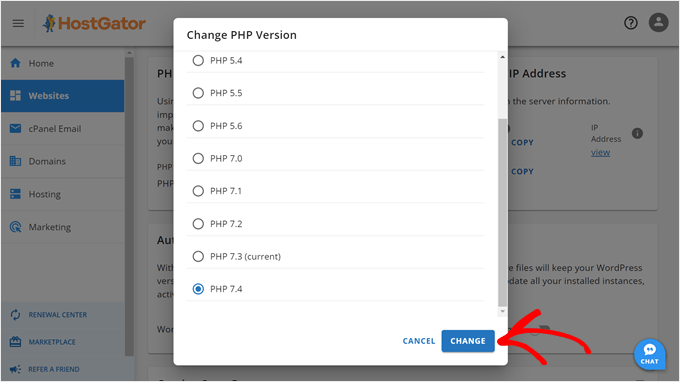
You will see a popup asking you to select the PHP version you want to update to.
Once you’ve made your choice, just click the ‘Change’ button.
How to Update Your PHP Version in DreamHost
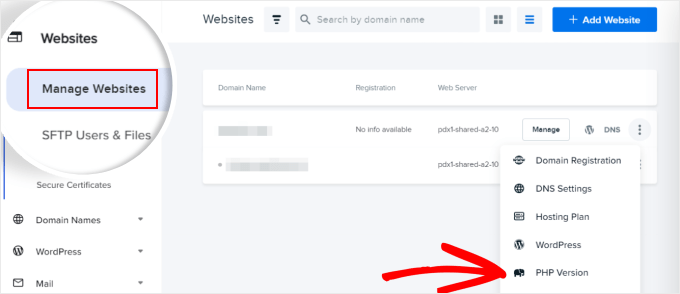
If you are a DreamHost user, you need to log in to your hosting account’s control panel. After that, navigate to the ‘Manage Websites’ tab from the left-side panel.
On the list of websites, just click the three-dot menu and choose ‘PHP Version.’
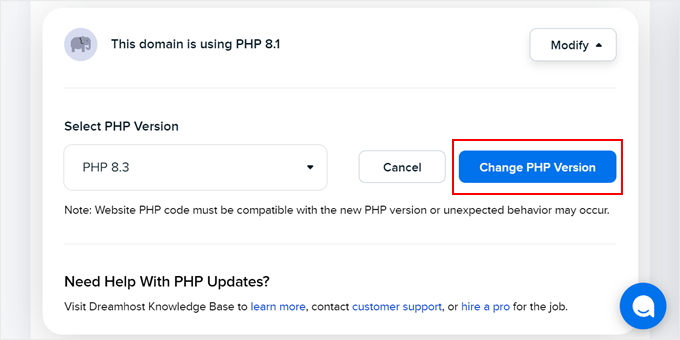
You will be directed to the PHP settings page inside the control panel.
Go ahead and choose a PHP version from the dropdown menu. Then, click ‘Change PHP Version’ to continue with the update.
How to Update Your PHP Version in WP Engine
WP Engine is a managed WordPress hosting company, which means they automatically upgrade the PHP version for you. However, you can also manually upgrade and downgrade the PHP version for your websites.
Simply log in to your WP Engine dashboard. On the ‘My Sites’ page, click on the PHP version next to your selected website.
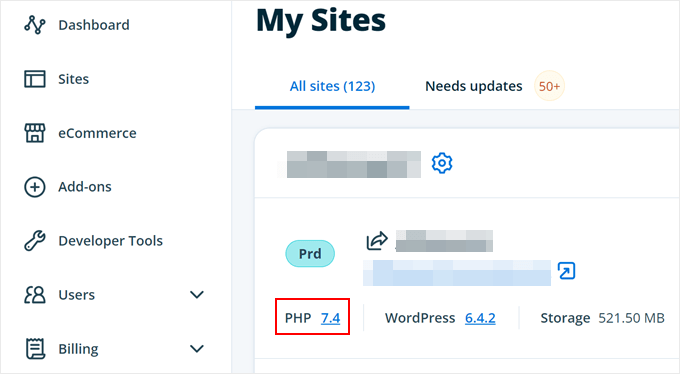
This will bring you to your website’s Overview settings. Here, WP Engine has a feature where you can preview your website on the latest PHP version without actually changing the PHP version.
If you want to try it out, go ahead and click ‘Preview PHP …’

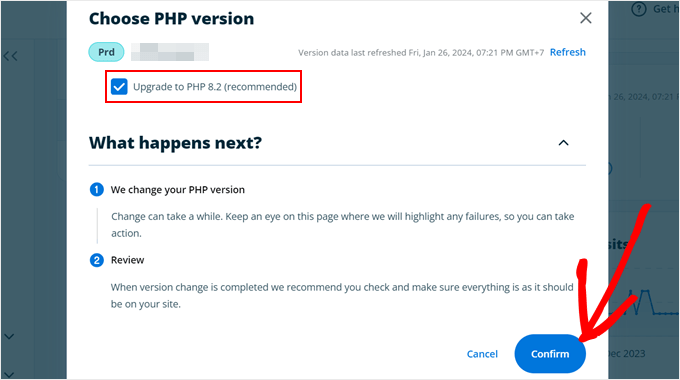
To actually update PHP in WP Engine, scroll down to the ‘Updates’ section.
Then, click on the PHP version number link.

Now, just choose the ‘Upgrade to PHP … ‘ option.
After that, click on the ‘Confirm’ button.
How to Update Your PHP Version in Other WordPress Hosting Providers
Most WordPress hosting providers organize their settings in a more or less similar way. You will most likely find the option to change a PHP version in the advanced settings of your cPanel or any other hosting control panel.
If you cannot find it, then you can check your provider’s knowledge base or contact their support team to change the PHP version of your website. For more information, you can check out our article on how to ask for WordPress support.
Changing PHP Versions in WordPress: Frequently Asked Questions
Now that we’ve discussed how to update your PHP version in WordPress, let’s cover some frequently asked questions about the topic.
What should you do after updating the PHP version?
After updating the PHP version for your WordPress website, you may want to ensure that everything is working as expected. We recommend visiting your website to see if there are any immediately noticeable issues.
After that, you can log in to the WordPress admin area of your website. Ensure your website uses the latest version of WordPress and all your plugins and themes are updated.
See our beginner’s guide on how to safely update WordPress for more information.
What do I do if a PHP update breaks my WordPress website?
It is unlikely that a PHP update will break a WordPress site. However, with the abundance of free and premium plugins, there is still a chance that a single line of poor code can result in any of the common WordPress errors.
First, you must ensure it is not a plugin or theme causing this error. To do that, you need to deactivate all your WordPress plugins and switch to a default WordPress theme.
If this does not solve your issue, then contact your web host’s support team. There is a good chance that the issue you are facing will already be on their radar, and they will be able to assist you.
If your web host is unable to help you out, then you can downgrade your PHP version using the methods described above.
We hope this article helped you learn how to update the PHP version of your WordPress site. You may also want to see our list of the fastest WordPress hosting providers on the market or our ultimate WordPress SEO guide to boost your search engine rankings.
If you liked this article, then please subscribe to our YouTube Channel for WordPress video tutorials. You can also find us on Twitter and Facebook.
The post How to Update Your PHP Version in WordPress (the RIGHT Way) first appeared on WPBeginner.
