Do you want to easily create a custom WooCommerce thank you page?
A custom thank you page for order confirmation is a great way to connect with your new customers and even get additional sales.
In this article, we’ll show you how to create a custom WooCommerce thank you page, step by step.

Why Customize a WooCommerce Thank You Page in WordPress?
Creating a custom WooCommerce thank you page gives you a way to connect with your customers when they make a purchase.
The order confirmation or thank you page may seem like a small part of your online store, but it can actually be a very valuable part of your sales process.
The problem is that default WooCommerce thank you page isn’t really optimized for conversions.
This is why smart business owners build a well-designed and high-converting thank you page to replace the default option.

There are a lot of ways you can use WooCommerce thank you pages:
- Recommend upsell products and make more sales
- Offer coupon codes for repeat purchases
- Highlight your best selling products
- Direct customers to your most useful content
With that said, let’s show you how to easily create a custom WooCommerce thank you page, step by step.
How to Easily Create Custom WooCommerce Thank You Pages
SeedProd is the best drag and drop WordPress page builder used by over 1 million websites. It lets you easily create a custom WooCommerce thank you page to boost sales and grow your customer relationships.
The first thing you need to do is install and activate the plugin. For more details, see our step by step guide on how to install a WordPress plugin.
Note: there is a free version of SeedProd available, but we’re going to use the Pro version since it includes the WooCommerce blocks we need.
Once the plugin is activated, you need to go to SeedProd » Settings and enter your license key.

If you don’t have this ready, then you can find your key in the account section of the SeedProd website.
After that, navigate to SeedProd » Pages and click the ‘Add New Landing Page’ button to create your new thank you page.
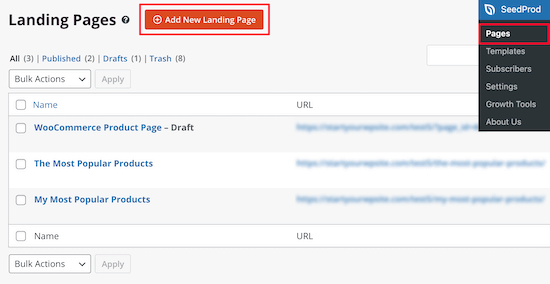
On this page, you’ll need to choose a template. You’ll find dozens of professionally designed thank you page templates to choose from.
Simply select the ‘Thank You’ page filter and find the ‘Order Completed Thank You Page’ template.
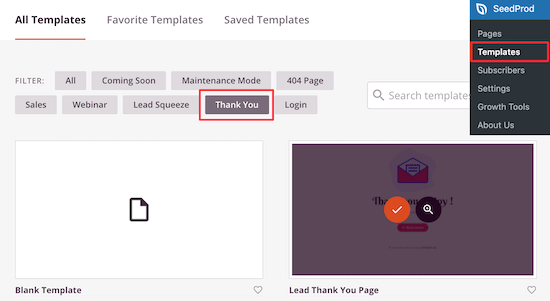
Then, hover over it and click the ‘Checkmark’ icon.
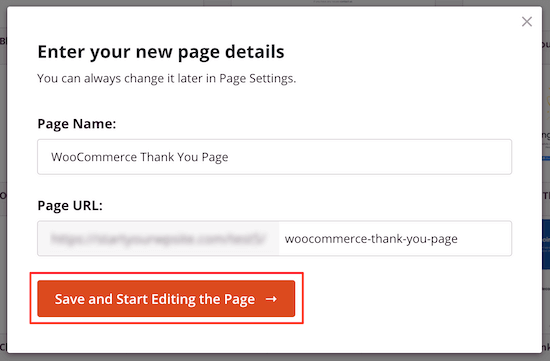
After that, you need to name your new thank you page and then click ‘Save and Start Editing the Page’. The name you give the page will also be the URL.
Now, it’s time to start editing your thank you page with the drag and drop builder.
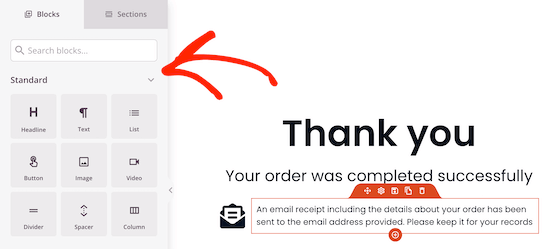
You’ll see a live preview of your page on the right. To edit the page element, simply click on the item, and an editing menu will appear on the left.
The left hand options panel has elements you can drag and drop onto your order confirmation page.
Now, we’ll start adding a few blocks and making some customizations to make it more like a WooCommerce thank you page.
First, we’ll add an upsell block to cross-promote another product. This is a great way to generate more sales for your store.
When someone completes a purchase, they’re more likely to buy again, especially if it’s related to what they just bought.
To do this, click on the ‘Section’ option in the left hand menu. This will bring up a screen that has different content sections. Select the ‘Hero’ option and then choose ‘Hero 2’ by clicking the ‘Plus’ icon.
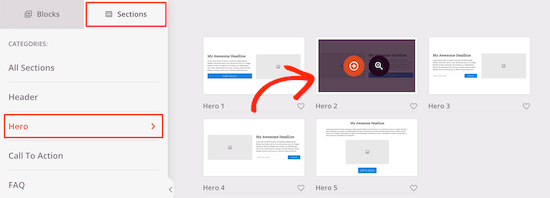
This will insert the section into your page.
Now, click the image icon and insert an image of the product you want to promote.
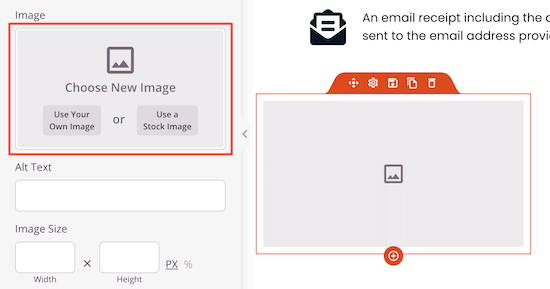
Then, do the same for the product title and the product copy.
After that, delete the button by hovering over it and clicking the ‘Delete Block’ icon.

Next, drag over the ‘Add To Cart’ block in the ‘WooCommerce’ section.
This replaces the old button with one that connects to your WooCommerce product.
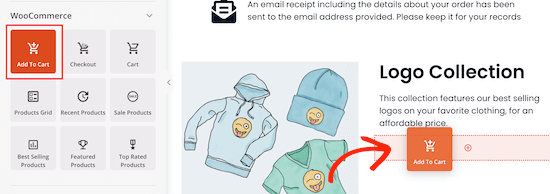
After that click the ‘Add To Cart’ button to bring up the editing menu. You need to enter your ‘Product ID’, so it will automatically be added to your customer’s cart.
If you don’t know your product ID, then you can find it by navigating to Products » All Products and locating your product.
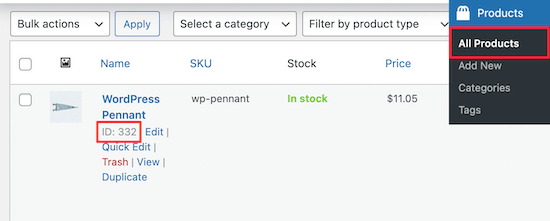
Then, navigate back to the editor, enter your product ID, and turn on the ‘Direct to Checkout’ slider.
You can also fully customize the button’s appearance, add sub text, change the color, and more.

After that, add a heading to promote your upsell product.
Click on the ‘Headline’ block and drag it above your upsell product. Then, add your enticing tagline.

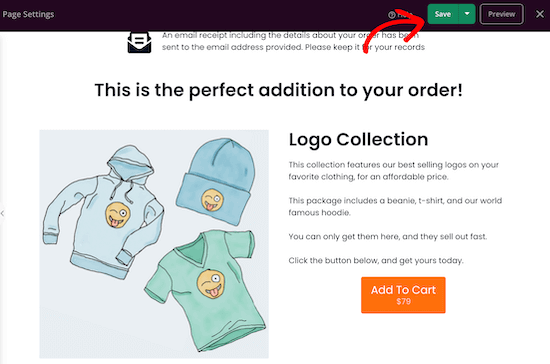
Once you’re done making changes make sure to click ‘Save’, or the drop down to ‘Publish’, if you want to make your page live.
Add a Repeat Purchase Coupon Code in WooCommerce
You can give your customers a unique coupon code that offers them a discount for rebuying the product.
Coupon codes are one of the best ways to get your customers to make another purchase. WooCommerce has standard coupons, but they’re pretty limited.
We recommend using the Advanced Coupons plugin. It’s the best WordPress coupon code plugin for your online store and is very beginner-friendly.
For more details on setting up the plugin, see our guide on how to create smart coupons in WooCommerce.
Upon activation, navigate to Coupons » License and enter your product license key and activation email, then click ‘Activate’.
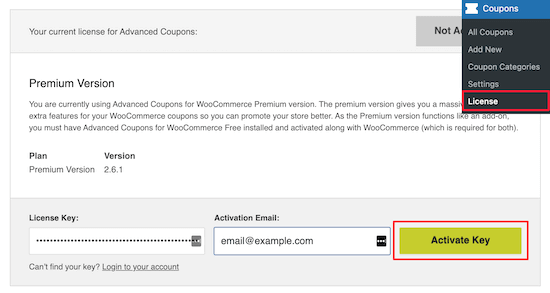
Then, navigate to Coupons » Add New to create a new coupon.
First, you can click ‘Generate coupon code’ or create your own coupon code name.

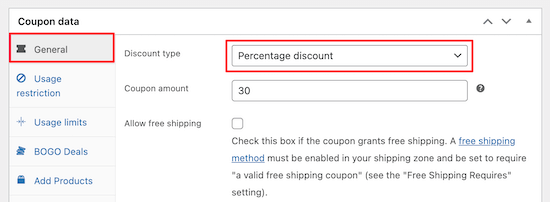
Once you’ve done that, locate the ‘General’ tab, here you’ll create your discount.
Select the ‘Percentage discount’ option and enter the percentage discount.
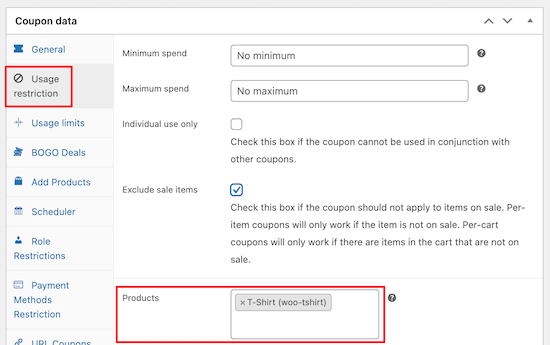
Next, you need to click on the ‘Usage restriction’ tab.
Then, select the product you want the discount to apply in the ‘Products’ box.
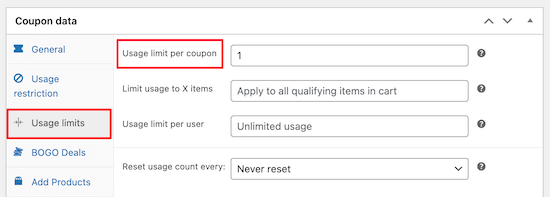
After that, click the ‘Usage limits’ tab.
In the ‘Usage limit per coupon’ box, enter 1. This limits how many times the coupon can be used.
Make sure you click ‘Publish’ or ‘Save’ before exiting the screen.
Once you’ve done that, go back to the SeedProd editor.
You can add the coupon code to your existing WooCommerce thank you page or create a new thank you page.
We will add the coupon code to our existing thank you page to give our customers another bonus.
In the page editor, click on the new block section and then choose your layout.

Next, select the ‘Text’ block and drag it onto the page.
Here is where you’ll enter your coupon code text.
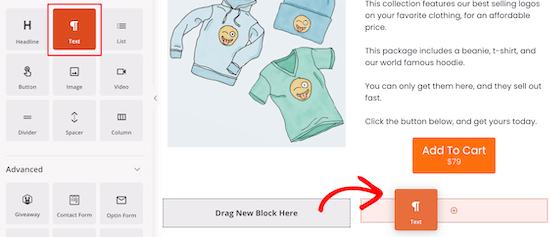
In the other block, you can add an image of the product they just purchased.
Simply drag the ‘Image’ block into the page editor and then upload your product image.
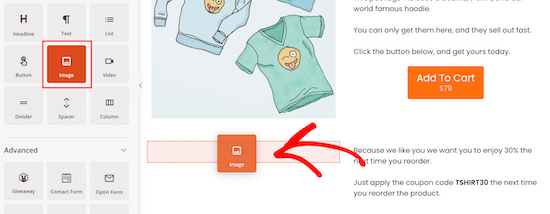
After that, you need to add a headline block so your customers know about the coupon code.
Just drag over the headline block and add your headline.

Here’s how the coupon code will display.
You can continue to customize this as much as you’d like.

Add a Best Selling Products Grid in WooCommerce
By adding your best selling products to your thank you pages, you can make more sales easily.
These products are proven to sell, so there’s already a good chance your customers are ready to buy.
To do this, simply drag over the ‘Best Selling Products’ block from the ‘WooCommerce’ section.
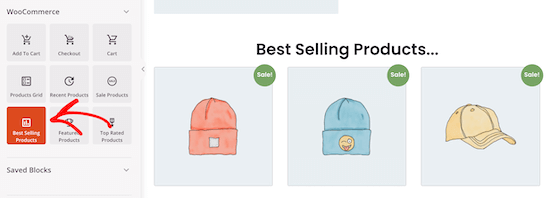
There are many other types of product grids you can add, like sale products, top rated products, recent products, and more.
For more details on adding best selling products in WooCommerce, see our guide on how to display popular products in WooCommerce.
Pro tip: you can setup WooCommerce conversion tracking to monitor clicks and conversions to make even more sales from your WooCommerce thank you pages.
Redirect the Default WooCommerce Thank You to Your New Page in WordPress
Once you’ve published your thank you page live you need to redirect this page in WooCommerce.
That way, when your visitors complete a purchase they will actually be redirected to your new page.
You can do this by modifying your WordPress theme files. However, the easiest way is using a WordPress plugin.
We recommend using the free Thanks Redirect for WooCommerce plugin, it’s very simple to use and will help you add the redirect simply.
First thing you need to do is install and activate the plugin. For more details, see our step by step guide on how to install a WordPress plugin.
Upon activation, navigate to WooCommerce » Settings and then click on the ‘Products’ tab.

After that click the ‘Thanks Redirect for WooCommerce’ link.
Once you’ve done that, click the ‘Enable Global Redirect’ box and enter your new WooCommerce page URL into the ‘Thanks Redirect URL’ box.

Then, click ‘Save Changes’ and your new thank you page will redirect when your customers complete an order.
We hoped this article helped you create custom WooCommerce thank you pages. You may also want to see our list of the best WooCommerce plugins for your store and our WooCommerce SEO guide to get more traffic.
If you liked this article, then please subscribe to our YouTube Channel for WordPress video tutorials. You can also find us on Twitter and Facebook.
The post How to “Easily” Create Custom WooCommerce Thank You Pages appeared first on WPBeginner.
